Select Configuration > Doors.
A list of configured doors is displayed.
Door inputs
Each door has 2 inputs with predefined functionality. These two inputs, the door position sensor and the door release switch can be configured.
|
Name |
Description |
|---|---|
|
Zone |
The door position sensor input can be used for the intrusion part as well. If the door position sensor input is used also for the intrusion part, the zone number it is assigned to has to be selected. If the door position sensor is used only for the access part, the option “UNASSIGNED” has to be selected. If the door position sensor is assigned to an intrusion zone, it can be configured like a normal zone but only with limited functionality (for example, not all zone types are selectable). If an area or the system is set with the card reader, the door position sensor input has to be assigned to a zone number and to the area or the system which have to be set. |
|
Description (Web only) |
Description of the zone the door position sensor is assigned to. |
|
Zone Type (Web only) |
Zone type of the zone the door position sensor is assigned to (not all zones types are available). |
|
Zone attributes (Web only) |
The attributes for the zone the door position sensor is assigned to can be modified. |
|
Area (Web only) |
The area the zone and the card reader are assigned to. (If the card reader is used for setting and unsetting, this area will be set/unset). |
|
Door Position (Web) DPS End Of Line (keypads) |
The resistor used with the door position sensor. Choose the used resistor value/combination. |
|
DPS Normal Open |
Select if the door release switch is to be a normally open or normally closed input. |
|
Door Release (Web) DRS END OF LINE (Keypads) |
The resistor used with the door release switch. Choose the used resistor value/combination. |
|
DRS Normal Open |
Select if the door release switch is a normally open input or not. |
|
No DRS (Web only) |
Select to ignore DRS. If a DC2 is used on the door, this option MUST be selected. If not selected, the door will open. |
|
Reader Location (Entry/Exit) (Web only) |
Select the location of the entry and exit readers. |
|
Reader formats (Web) READER INFO (Keypads) |
Displays format of last card used with each configured reader. |
| Each free zone number can be assigned to the zones but the assignment is not fixed. If the number ‘9’ is assigned to a zone, the zone and an input expander with the address ‘1’ is connected to the X-Bus (which is using the zone numbers 9–16). The assigned zone from the two door controller will be moved to the next free zone number. Configuration will be adapted accordingly. |
Door attributes
| If no attribute is activated, a valid card can be used. |
|
Attribute |
Description |
|---|---|
|
Void |
The card is temporarily blocked. |
|
Door Group |
Used when multiple doors are assigned to the same area and/or anti passback, custodian, or interlock functionality is required. |
|
Card and PIN |
Card and PIN are required to gain entry. |
|
PIN Only |
PIN is required. No card will be accepted. |
|
PIN Code or Card |
PIN or card are required to gain entry |
|
PIN to Exit |
PIN is required on exit reader. Door with entry and exit reader is required. |
|
PIN to Set/Unset |
PIN is required to set and unset the linked area. The card has to be presented before the PIN is entered. |
|
Unset outside (Browser) |
Panel/area will unset, when card is presented at entry reader. |
|
Unset inside (Browser) |
Panel/area will unset, when card is presented at exit reader. |
|
Bypass alarm |
Access is granted if an area is set and the door is an alarm or an entry zone type. |
|
Fullset outside (Browser) |
Panel/area will fullest, when card is presented twice at entry reader. |
|
Fullset inside |
Panel/area will fullest, when card is presented twice at exit reader. |
|
Force Fullset |
If the user has rights, they can force set from entry reader. |
|
Emergency |
Door lock opens if a fire alarm is detected within the assigned area. |
|
Emergency any |
Fire in any area will unlock the door. |
|
Escort |
The escort feature enforces privileged card holders to escort other card holders through specific doors. If this feature is assigned to a door, a card with the “escort right” has to be presented first, to allow other cardholders without this right to open the door. The time period in which cardholders are able to present their cards after a card with escort right was presented, can be configured per door. |
|
Prevent Passback* |
Anti-passback should be enforced on the door. All doors must have entry and exit readers and must be assigned to a door group. In this mode, cardholders must use their access card to gain entry into and exit from a defined door group. If a valid cardholder has presented his access card to enter a door group and not presented the card to exit it, the cardholder is in breach of the anti-passback rules. Next time the cardholder attempts to enter the same door group, a hard anti-passback alarm will be raised and the cardholder will not be permitted entry to the door group. |
|
Soft Passback* |
Anti-passback violations are only logged. All doors must have entry and exit readers and must be assigned to a door group. In this mode, cardholders must use their access card to gain entry to and exit from a defined door group. If a valid cardholder has presented his access card to enter a door group and not presented the card to exit it, the cardholder is in breach of the anti-passback rules. Next time the cardholder attempts to enter the same door group, a soft anti-passback alarm will be raised. However, the cardholder will still be permitted entry to the door group. |
|
Custodian* |
The custodian feature allows a card holder with custodian right (the custodian) to give other cardholders (non-custodians) access to the room. The custodian must be the first to enter the room. The non-custodians are only allowed to enter if the custodian is in the room. The custodian will not be allowed to exit until all non-custodians have left the room. |
|
Door Sounder |
Door controller PCB mounted sounder sounds on door alarms. |
|
Ignore Forced |
Door forced open is not processed. |
|
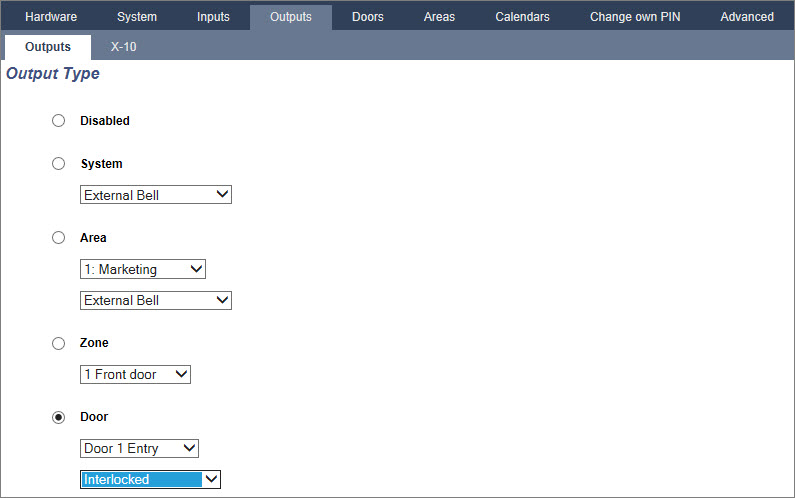
Interlock* (Browser) |
Only one door in an area will be allowed open at a time. Requires Door Group. |
|
Setting Prefix |
Authorisation with prefix (A,B,* or #) key to set system |
* Require door group
Door timers
|
Timer |
Min. |
Max. |
Description |
|---|---|---|---|
|
Access granted |
1 s |
255 s |
The time the lock will remain open after granting access. |
|
Access deny |
1 s |
255 s |
The duration after which the controller will be ready to read the next event after a invalid event. |
|
Door open |
1 s |
255 s |
Duration within which the door must be closed to prevent a “door open too long” alarm. |
|
Door left open |
1 min |
180 min |
Duration within which the door must be closed to prevent a “door left open” alarm. |
|
Extended |
1 s |
255 s |
Additional time after granting access to a card with extended time attribute. |
|
Escort |
1 s |
30 s |
Time period after presenting a card with escort attribute within a user without escort right can access the door. |
Door calendar
|
Door locked |
Select a calendar which should lock the door during the configured time. No card/pin will be accepted during this time. |
|
Door locked |
Select a calendar which should unlock the door. The door will be unlocked during the configured time. |
Door triggers
|
Trigger |
Description |
|---|---|
|
Triggers that will Momentarily Unlock door |
If the assigned trigger is activated, the door will unlock for a defined period, then lock again. |
|
Trigger that will lock the door |
If the assigned trigger is activated, the door will get locked. No card/PIN will be accepted. |
|
Trigger that will unlock the door |
If the assigned trigger is activated, the door will get unlocked. No card/PIN will be needed to open the door. |
|
Trigger that will set the door to normal |
If the assigned trigger is activated, the door will get back to normal operation. This is to undo locking/unlocking of the door. A card/will be is needed to open the door. |
Door interlock is feature that prevents the remaining doors in an interlock group from opening if any one door in the group is open.
The following are example of how this feature is used:
To create a door lock:
To configure an output for door interlock.